Bridge City Tool Works AngleMaster Pro V2
I recently had an opportunity to play with the new AngleMaster Pro V2 from Bridge City Tool Works. It’s a bit of an odd-looking contraption, but what it lacks in svelteness it makes up for in accuracy and precision. It’s essentially a protractor—a device for measuring angles. But what a protractor it is! How many other protractors do you know of that can accurately measure an angle to better than a hundredth of a degree, with 100% repeatability?
That is the promise of the AngleMaster Pro, and so I set out to see if it really delivers. The device that I tested is a prototype, and John Economaki of Bridge City tells me that the production version will have a few minor changes, but the basic look and feel will be the same. Also, the production version doesn’t come with a digital caliper—you have to supply your own. (If you already have a digital caliper, you can use it, but be aware that in the long run you’ll want to dedicate one to the AngleMaster Pro; removing and reinstalling the caliper isn’t something you’re going to want to do every day.)
The prototype that I tested had a high quality Mitutoyo caliper preinstalled. Although it worked well, it has a minor quirk that I’ll describe in more detail in just a moment.
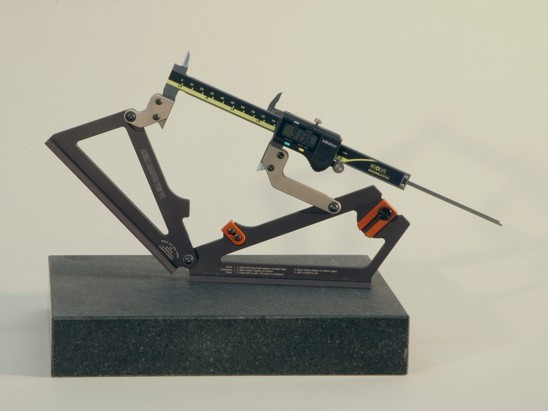
Setting up the AngleMaster Pro and performing an initial calibration is quick and easy—so simple, in fact, that the steps are engraved on the front of one of the arms of the AngleMaster Pro. To perform the calibration, you need to procure a good straightedge. I realized that my granite surface plate would serve well, so I used it as my straightedge. Begin by opening up the AngleMaster Pro’s arms and placing them in contact with the straightedge so that the two measurement faces are perfectly aligned, then press the Zero button on the digital caliper to zero the reading:
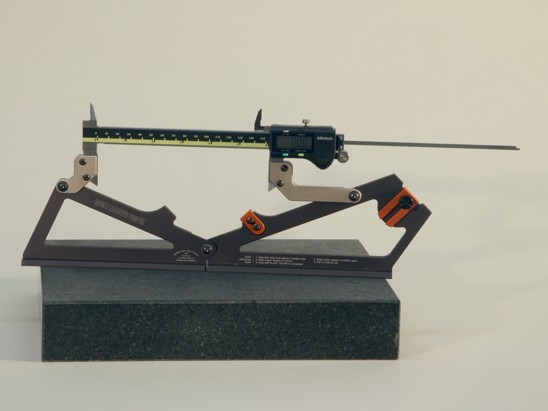
Next, close the arms until the digital readout displays ‒152.40mm (the arms will be at precisely 90° to each other at this point):
Finally, without moving the arms, press the Zero button one more time. That’s all there is to it. The AngleMaster Pro is now calibrated and ready for use.
And now the Mitutoyo’s quirk: What we’ve just done is used the caliper in relative measurement mode: we set the zero to an arbitrary point and then measured the difference from that point. With most no-name, battery-eating digital calipers, relative mode is the only mode that there is. But the Mitutoyo uses a more sophisticated type of linear encoder, and offers an absolute mode as well. The problem is that when you turn the Mitutoyo caliper off and then on again, it always boots up in absolute mode. And the reason that’s a problem is that the reading in absolute mode is typically a fraction of a millimetre off from the reading in relative mode. If you’re not paying attention, it’s easy to make measurements that are just a little bit off… The discrepancy is small enough that you could easily not notice, but big enough to cause significant errors in your angles.
So it’s not really a quirk per se; just a feature that can, in this application at least, get in the way. There are a few ways to deal with the issue:
- Always recalibrate the AngleMaster Pro, every time you turn it on.
- The Mitutoyo caliper includes a way to reset the absolute origin (I guess absolute mode isn’t quite so absolute after all): Once you’ve completed the calibration procedure, you can press and hold the Origin button to reset the absolute origin so that it coincides with the relative origin that resulted from the calibration process.
- Just leave the caliper on all of the time.
Although it takes a few seconds, I think recalibrating the AngleMaster Pro every time you turn it on is probably the better way to go. But leaving the caliper on isn’t out of the question, as the Mitutoyo apparently consumes so little power that even if you leave it on, the battery will last a couple of years or so.
You mean I have to use math???
As a physicist, I’ve never been afraid of math. In fact, I’m quite fond of it. Nevertheless, when it comes to woodworking, I’m a firm believer in the measure-directly-off-the-workpiece technique, because it’s far less likely that you’ll make a mistake that way. But while that works well for case goods, it’s far less effective with chairs, which are basically a collection of sticks pointing in odd directions, and a seemingly minor discrepancy in one joint can mean that another joint elsewhere in the chair doesn’t even come close to meeting up. (That’s one reason why chair makers have traditionally worked from full-size drawings.) And the technique completely falls apart with things like boxes having compound-angled sides. With those, you’re in a kind of Catch-22 situation: You can’t know what the angles for one face should be until you have the other face in place, but you can’t cut that face without the first face in place to act as a reference.
So yes, Virginia, you do have to use math. Sorry.
I think digital instruments exacerbate the Fear of Numbers because they offer so much apparent precision. People know that a sixteenth of an inch is precisely 0.0625″, and so if they are using a caliper, they assume that they need to trim their workpiece to exactly that. The best way to deal with that kind of anxiety is to get a good feel for the concept of tolerance. With woodworking in particular, while a dimension may nominally be 1/16″, most of the time you just need to be in the general ballpark, so if your caliper measures anything between 0.05″ and 0.07″, you’re probably fine. It does take some experience to gain that feel for where you can allow a large tolerance and where you can’t, but it’s really not a difficult concept.
The same is true for angular measurements. No one is going to notice if a leg on a chair is off-angle by a half a degree, so there’s no point in sweating over it. On the other hand, there is one place where angular tolerance really does have to be tight: When you’re making something that’s in the shape of a closed polygon, all of your miter angles have to be dead on, or the polygon won’t close. And that’s the beauty of a tool like the AngleMaster Pro: You won’t always need its capability for high precision, but when you do need it, it’s there.
Because the digital caliper on the AngleMaster Pro reads in millimetres, not degrees, and assuming you’re not Zack Addy and can compute the necessary conversions in your head, you need a converter of some kind. The AngleMaster Pro comes with a full table of integral-degree equivalents engraved on the back:
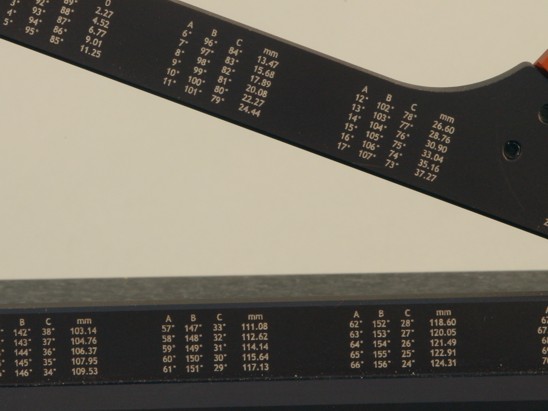
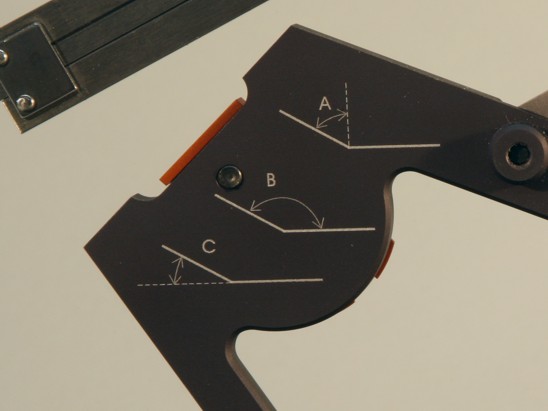
There are three sets of numbers because there are (at least) three ways to define the angle; this is also noted on the back of the AngleMaster Pro:
The table will only get you so far; if you do any compound angle work, you will most definitely need to work with fractions of a degree. And you also need some way to figure out what angles you’re going to need to use in the first place. Enter the AngleMaster Pro’s companion iPhone/iPad app. This app includes a wide range of functions for computing angles, and for converting them to the AngleMaster Pro’s millimetre scale. I’ll only be looking at a couple of the app’s plethora of features in this review, so be sure to visit the Bridge City web site and have a look at the short video describing the app. (Although the app is restricted to the iPhone and its relatives at the present time, I understand that Bridge City is working on making it more widely available on different platforms.)
By now, you will have no doubt noticed that the AngleMaster Pro moves over an included angle (angle B above) of 90‒180°. What if you want to measure an angle less than 90°? For that, it’s a simple task to transfer the complementary angle (angle C above) to a bevel gauge:
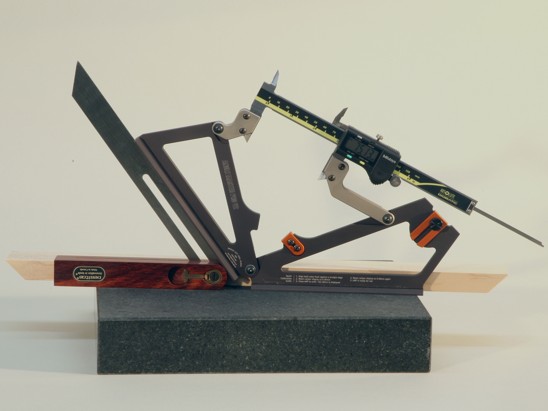
Here, I used an auxiliary straightedge (a piece of hard maple, in this case) to keep the AngleMaster Pro and the bevel gauge aligned. Although it’s not evident in the photo, putting the two gauges in front of a white background and sighting through the gap between them is a very effective way to ensure that the two angles are precisely the same—the light coming through the gap will go to nearly zero when the angles match.
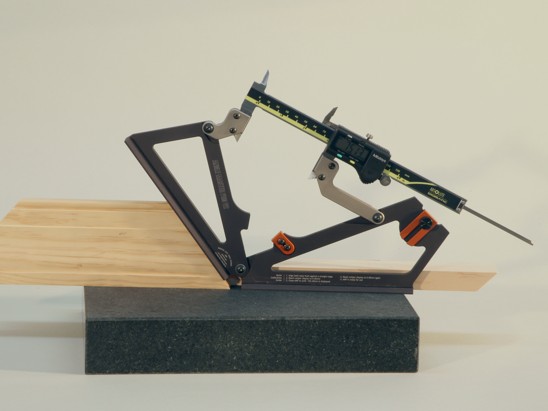
You can of course use the same technique to gauge a workpiece after you’ve cut it:
Pentaframe
Enough with the small talk. The proof of the pudding is in the eating, as they say. For my first test of the AngleMaster Pro’s capabilities, I decided to build a small, flat pentagonal frame (I’m calling it the “pentaframe”), using some off-the-shelf door casing molding. The pentaframe doesn’t contain any compound angles, but to make things at least a little interesting, I decided to design it with unequal vertex angles. To get all of the dimensions right, I first modeled the pentaframe in Google SketchUp. You can download a copy of the model here.
Here’s what I came up with: The bottom piece is 10.62″ long, and the included angles on each end are 98° (instead of the 108° that a regular pentagon would have). The two side pieces are each 10.70″ long, and the included angles on their top ends are both 108°. The two top pieces are 7.56″ long, and the top included angle is 128°.
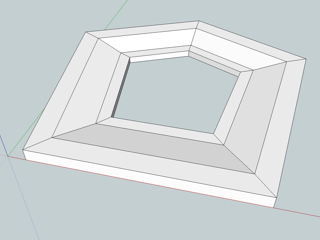
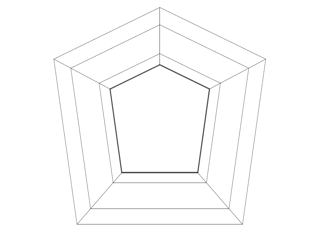
This is the pentaframe model, in a perspective view, as it would look from inside SketchUp.
And here’s the same model in plan view.
I decided to make my cuts using my miter saw. I am “blessed” with a miter saw whose right and left fences are cast from a single piece of aluminum, yet are nevertheless not quite aligned, which makes accurate cuts a bit of a challenge. I also noticed recently that I can easily cause the cut line to deviate by a good fraction of a degree either way, just by varying the amount of sideways pressure I put on the handle while making a cut.
Despite these issues, using the AngleMaster Pro and exercising some care while cutting I was able to set the saw up to make accurate and repeatable cuts. Here’s the AngleMaster Pro on the miter saw:
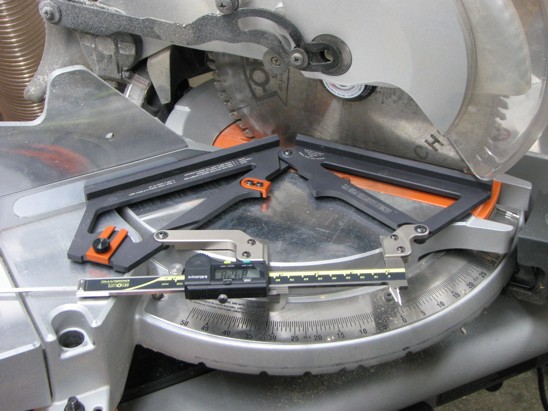
In this photo, the caliper is set for the miter at each end of the bottom edge of the pentaframe. As noted previously, the included angle at these corners is 98°, so the miter angle is half that, or 49°. Looking up the conversion on the back of the AngleMaster Pro, I find that a C angle of 49° requires a caliper setting of 84.29mm. (A close inspection of the photo reveals that the caliper is actually set to 84.28mm, but that’s within the required tolerance for this joint.)
I encountered two issues with this setup: First, because the saw blade’s teeth are thicker than the saw plate, I was not able to place the AngleMaster Pro in contact with the blade. To compensate, I inserted a thin shim (not visible in the photo). For the production version of the AngleMaster Pro, there will be an accessory shoe set available, but the accessory shoes were not ready in time for this review. (The measurement arms have a dovetail cross-section, and the shoes will slide on and off.) One of the available shoes has a knife-edge sole designed for exactly this purpose; the knife edge is narrow enough to fit between a pair of teeth.
The second issue is not at all obvious from the photo: The measurement arms of the AngleMaster Pro contain rare earth magnets. You don’t want to place a strong magnet near a thin saw blade, because the magnetic force is easily enough to deflect the blade and knock your measurement out of whack. I didn’t have a good solution for this problem while I was making these cuts (I could have used a thicker shim, I suppose), but again, the knife-edge accessory shoe should keep the magnets far enough from the blade to avoid the problem.
I should mention that the AngleMaster Pro has a couple of bosses on the back side, so that it sits nicely flat when you lay it down on its side as shown in the photo. Unfortunately, it appears that this will no longer be true when the accessory shoes are installed.
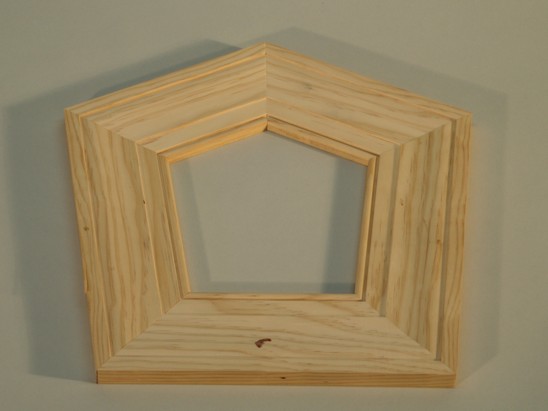
Finally, here is the actual pentaframe in the flesh, so to speak. The angles are about as perfect as they can be, all on the first try. (Please ignore the reddish blotch on the lower piece; I nicked my finger while working on this, and I didn’t notice until I had bled all over everything. Also, what looks like a misalignment in the lower left corner is actually a misplaced pencil mark.)
So what did I learn from this exercise? If anything, I learned that having a measuring tool with the kind of accuracy and precision that the AngleMaster Pro possesses means that it’s that much easier to see the comparative lack of accuracy and precision in all of my other tools! Fortunately, as I showed above, in addition to being useful for machine setup, the AngleMaster Pro can also be used to “ground truth” a workpiece after it’s been cut, and verify that the machine has been set up correctly and that its cuts are reproducible.
Heptabowl
Well, that was almost too easy. For my second test, I decided to try something a bit more challenging, and include some compound angles. And I’ve always liked prime numbers, so a seven-sided vessel seemed about right. Fortunately, the remnants of my sanity kicked in before I got too carried away, and I decided to make it symmetrical, unlike the pentaframe. And so I hereby present to you the heptabowl:
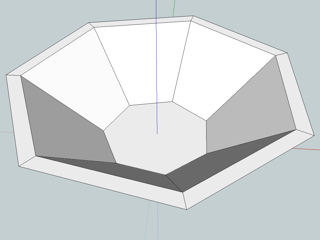
Here’s a look at the heptabowl SketchUp model. You can download it here.
— COMING SOON —
The bottom line
Having played with the AngleMaster Pro for a few weeks now, I can say with complete honesty that, as far as I can tell, it is essentially perfect. That is, the measurements made with it are absolutely repeatable, and well within the claimed 30-arc second tolerance.
Do you need one? The AngleMaster Pro certainly isn’t something that you’ll use every day. But when you do need it, you need it bad. There just isn’t anything else that can do what it can do.
What’s not to like about it? Not a lot, really. Although it feels very sturdy in the hand, I was always nervous that I was going to drop it onto a concrete floor. (Of course, part of that could be the fact that it was just on loan.) My other very minor complaints have to do with the caliper: The inside-measurement jaws at the top are awfully pointy. And when the caliper is opened wide, the depth bar (the skinny rod that comes out the tail end) is both vulnerable and hazardous. Of course, if you’re going to dedicate a caliper to the AngleMaster Pro (and you should), then you can grind off all of the pointy bits.